


Learning how to remove background in Canva takes one button and about ten seconds of waiting. Select the photo, click BG Remover in the toolbar above the canvas, and Canva cuts the subject out for you. The whole job is faster than opening an image editor.
The part that trips people up comes later. A cutout that looks perfect on screen can download with a solid white rectangle behind it, because transparency is a download setting rather than something the cutout carries on its own. This guide covers the cutout, the brushes that fix the bits Canva misses, and the download panel that decides whether the background stays gone.
The short version
Select the photo in your design, choose BG Remover from the toolbar above the canvas, and wait for Canva to finish. To keep the transparency, open Share, choose Download, set the file type to PNG, and switch on Transparent background before you download.
What you need before you start
BG Remover is a paid feature. Canva lists it under Pro, Pro Lite, Teams, Business, Enterprise, Education and Nonprofit, and it is not part of Canva Free. On a free account the button still appears, but selecting it opens an upgrade prompt instead of cutting the photo out.
| Plan | BG Remover | Notes |
|---|---|---|
| Canva Free | No | The button is visible but asks you to upgrade |
| Canva Pro | Yes | Includes the erase and restore brushes |
| Canva Teams | Yes | Same tool, shared across the team |
| Canva for Education | Yes | Free for verified teachers and students |
| Canva for Nonprofits | Yes | Free for approved organisations |
Education and Nonprofit both carry the tool at no cost, which is worth knowing before paying for Pro. Verification takes a few days in each case. If none of those apply and you only need the occasional cutout, one of the free photo editors on our list will do the same job without a subscription.
You also need the photo already placed in a design. BG Remover works on an image on the canvas, so create any design, drop the photo in from Uploads, and click it once to select it.
How to remove background in Canva on desktop
The desktop route is four clicks. Canva processes the image on its servers, so the wait depends on the file size rather than on your computer.
- Select the photo. Click it once on the canvas. A purple border with round handles appears, and the toolbar above the canvas changes to the photo controls. If you see text controls instead, you have selected a text box by mistake.
- Click BG Remover. It sits in that toolbar, next to Edit. The button carries the same name on every platform, which makes it easy to find again.
- Wait for the pass to finish. A progress indicator runs over the image. Simple subjects take a few seconds and busy ones take longer.
- Check the edges. The background turns into a grey and white chequerboard, which is how Canva shows transparency. Zoom in on hair, glasses and anything thin before you move on.

If the toolbar looks different, you may be working from the side panel instead. Opening Edit image puts Background Remover at the top of the effects list, and it does the same thing as the toolbar button.

Removing a background in the Canva mobile app
The phone app uses the same button name, which is unusual for a tool this size and makes the steps easy to carry between devices.
- Open the design and tap the photo once so the bottom toolbar appears.
- Tap BG Remover in that toolbar.
- Wait while Canva processes the photo, then pinch to zoom in and check the edges.
The result syncs to the same design on desktop, so a cutout made on a phone during a commute is waiting on the laptop later. Nothing needs exporting in between.
Fix the edges with the erase and restore brushes
Canva misses things. Hair against a dark background, a gap between an arm and a torso, the leg of a chair showing through a handle: these all survive the first pass and need a manual correction.
Selecting BG Remover a second time opens the brush panel rather than running the cutout again. That panel carries two brushes and a size slider.
- Erase takes away more of the image. Use it on background Canva left behind, such as a patch of sky trapped under an elbow.
- Restore paints the original photo back in. Use it where the cutout bit into the subject, which usually happens at hair and fingertips.
- Brush size controls how much each stroke covers. Drop it to single figures for detailed work and raise it for large areas.
- Show original image dims the cutout so you can see what was there before, which makes it far easier to judge where an edge should fall.

Work zoomed in at 200 percent or more. At normal zoom a ragged edge looks acceptable and then falls apart the moment the image is placed on a coloured background.
Download it so the background stays gone
This is the step that sends people back to search. The cutout is transparent inside Canva, but most file types cannot store transparency, so a JPG download fills the empty area with white.
- Open Share at the top right, then choose Download.
- Set File type to PNG. WebP also supports transparency if you need a smaller file.
- Tick Transparent background.
- Click Download and check the saved file against a coloured background, not a white one.
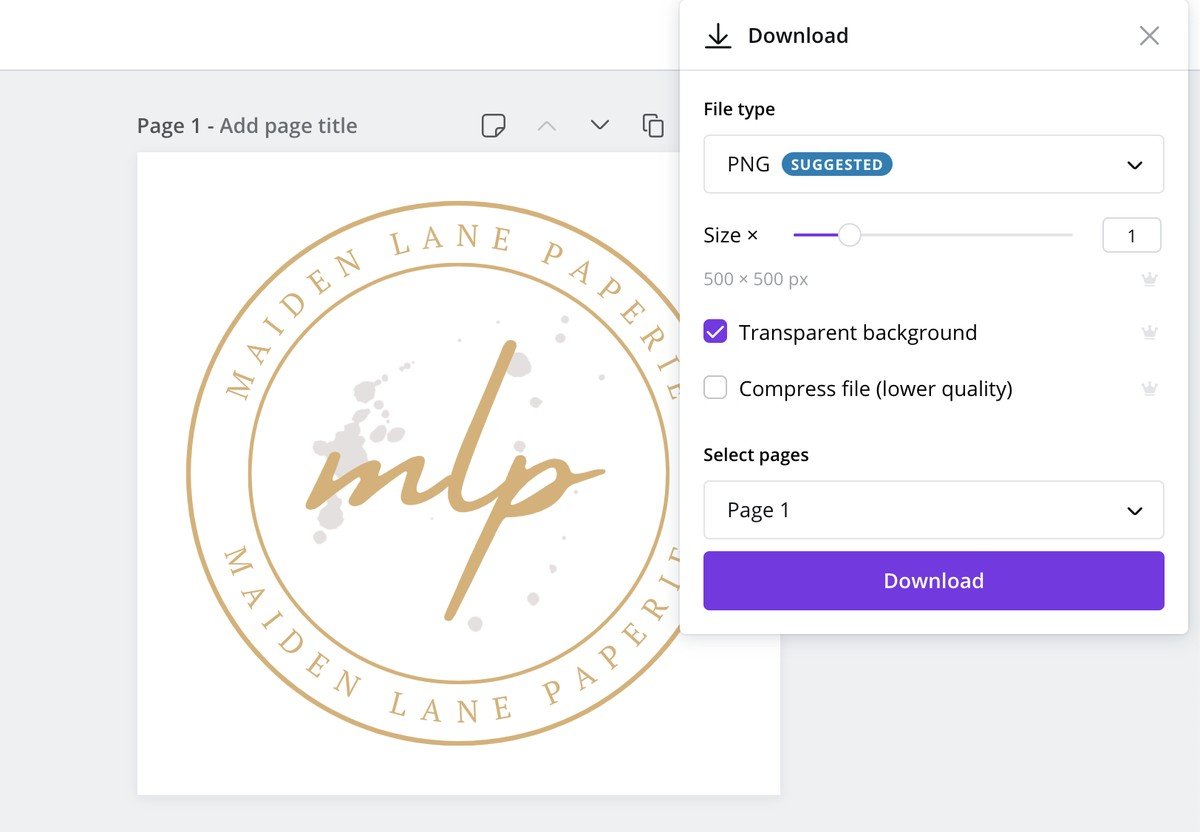
Transparent background is itself a paid option, so it sits on the same plans as the cutout tool. If the downloaded file still shows a background after all that, the design has its own background colour behind the photo. Click an empty part of the canvas, open the colour control and set it to transparent, or delete the background element outright.
Cut out up to 50 photos at once
BG Remover is not limited to one image at a time. Canva runs the same cutout across a whole folder, which turns an afternoon of product photos into a single action.
- Open Projects from the left sidebar and go into the folder holding the photos.
- Select the images you want, up to 50 in one pass.
- Choose Remove background.
Your originals are untouched, so a cutout that comes back wrong costs you nothing. That matters for a catalogue, where a handful of images in every batch will need the restore brush afterwards.
The same Projects route works on a single file without opening a design at all. Find the image, open More, then Edit image, then Image Tools, and select BG Remover there.
Which photos cut out cleanly
The quality of the result is decided before Canva sees the file. Two photos of the same subject can produce a clean cutout and a ragged one depending on what is behind it.
- Contrast between subject and background does most of the work. A dark jacket against a dark doorway is the hardest case there is.
- Resolution gives the tool more edge to read. A 300-pixel-wide thumbnail produces a soft, blocky outline no brush can rescue.
- Hard edges beat soft ones. Bags, bottles and furniture cut out almost perfectly; hair, fur, netting and smoke need manual work every time.
- Motion blur confuses the boundary, so a sharp frame beats a flattering one when the photo is destined for a cutout.
Two mistakes that put the background back
Both of these produce a file that looks wrong only after it has been sent to somebody else, which is the worst time to find out.
- Downloading as JPG. The format has no transparency channel at all, so the cutout arrives on a white rectangle. There is no setting that changes this. Use PNG or WebP.
- Flattening the cutout into a shape or frame. Dropping a cut-out photo into a frame crops it to the frame, and the transparent area outside the frame is filled. Place the cutout on the canvas directly when you need the shape to stay irregular.
A third issue is subtler. A cutout that will sit on a dark background often keeps a thin light halo from the original photo. Running the Erase brush around the outline at a small brush size removes it in a few strokes. It is the same correction you would make in a video editor after a green screen key, for the same reason.
Frequently Asked Questions
Can I remove a background in Canva for free?
Not with BG Remover. Canva lists it as a premium feature on Pro, Pro Lite, Teams, Business, Enterprise, Education and Nonprofit. Teachers, students and approved nonprofits get those plans at no cost, which is the only route to the tool without paying.
Does Canva remove backgrounds from video?
Yes, through a separate tool. The still-image BG Remover does not act on a video clip, and the video version runs as its own process with a longer wait, because every frame has to be handled.
Why does my cutout still have a white background?
Almost always the file type. PNG and WebP carry transparency and JPG does not. Check that Transparent background was ticked in the download panel as well, and that the design itself does not have a white background element sitting behind the photo.
Can I undo a background removal?
Yes. Ctrl+Z or Cmd+Z reverses it immediately after the pass, and the original photo also stays in your Uploads, so you can drag a clean copy back onto the canvas at any point.
Related Articles

Get the Fox Bulletin briefing
The stories that matter, in your inbox. No spam, unsubscribe anytime.
Newsletter signup will be available soon.
Related stories

How to Add Music to Canva Designs and Videos
Adding the track is one click. Trimming it, fading it and exporting in a format that carries sound at all are the three steps that decide whether anyone hears it.

How to Highlight Text in Canva Three Different Ways
One effect does it in two clicks, and its three sliders decide whether the result looks like a marker pen or a solid block.

Connected Carousel in Canva: Build One That Lines Up
The design half is one wide canvas. The half that stops people is the split, because Canva has no built-in command for it and the answer is an app.