

Learning how to curve text in Canva means finding one control that sits three levels into the Effects panel. Select the text, open Effects, and under the Shape heading choose Curve. The words bend along an arc straight away.
The part worth knowing is what happens next. Selecting Curve a second time opens a slider that controls how tight the arc is and which way it bends, and that slider is the whole of the control you get. This guide covers the sequence, the slider, the two things curved text in Canva cannot do, and the workarounds for both.
The short version
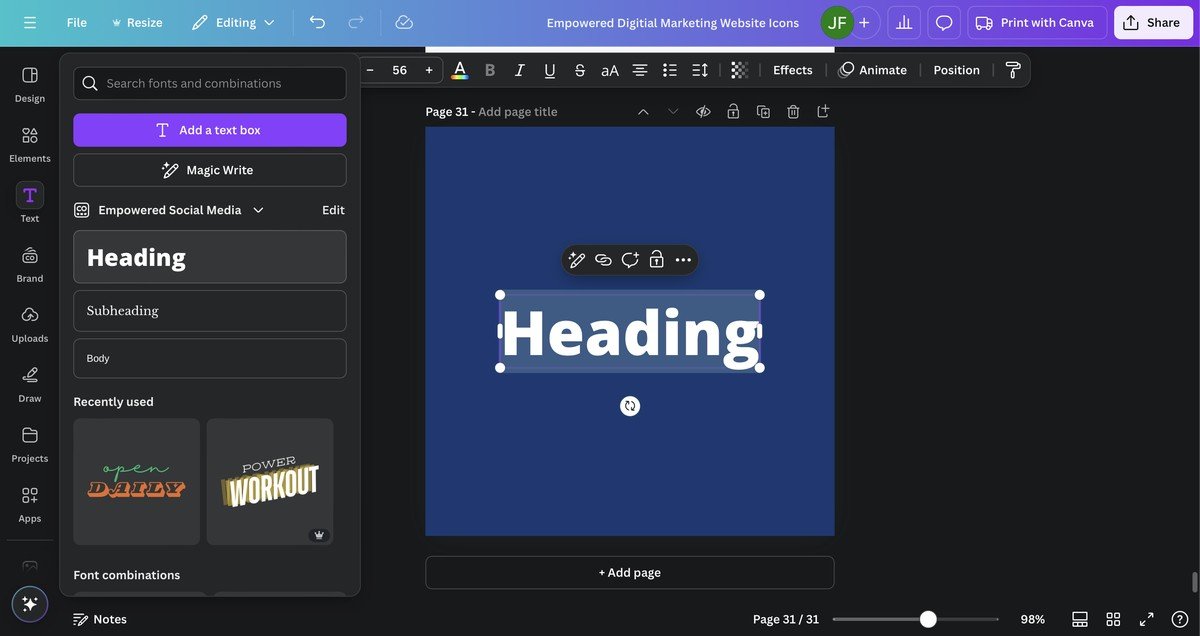
Click the text box once, then choose Effects in the toolbar above the canvas. Scroll to the Shape section and select Curve. Select Curve again to reveal the slider, then drag it to set how far the text bends. The steps are the same on desktop and in the app.
Curve text on desktop step by step
The text has to exist first. Add a text box with the T key or from the Text panel, type the words, and click once so the box is selected rather than open for editing.
- Select the text box. One click gives it a purple border and changes the toolbar above the canvas to the text controls. A flashing cursor inside the box means you are in editing mode, which hides some of the options.
- Open Effects. It sits in that toolbar and opens a panel down the left side of the screen.
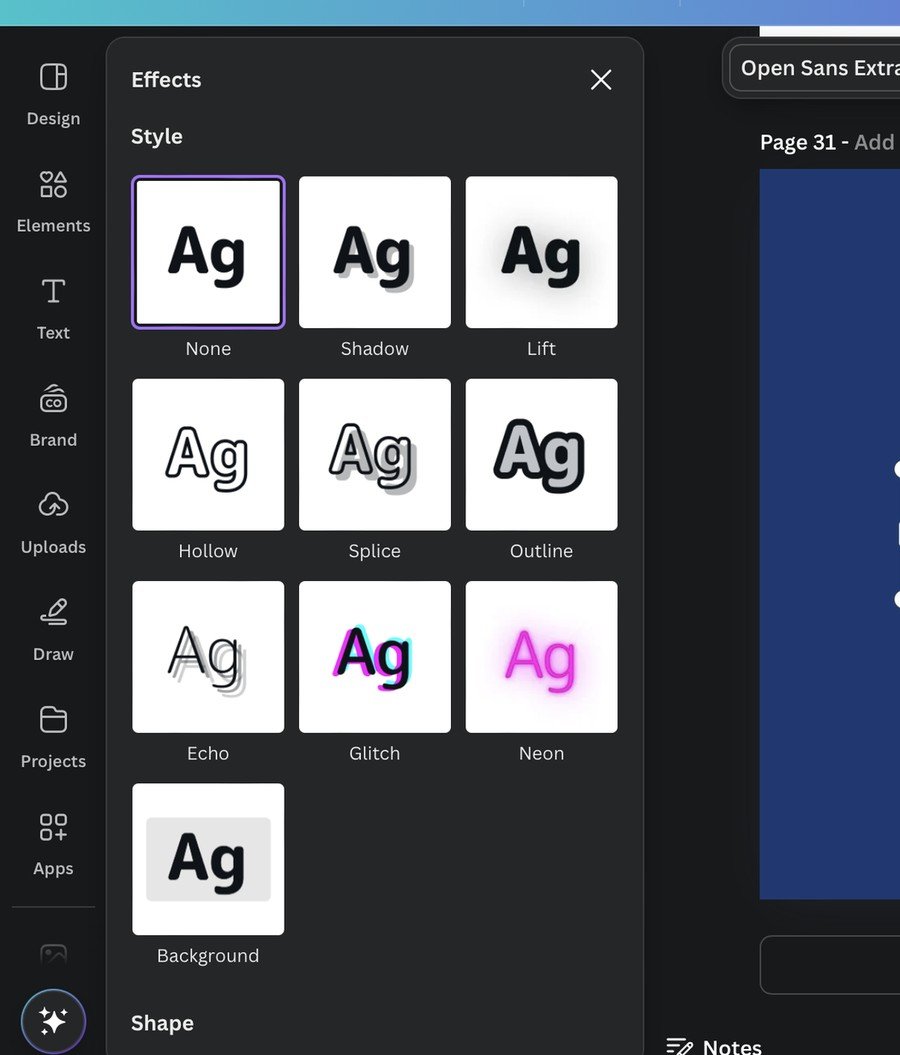
- Scroll to Shape. The panel leads with Style tiles for Drop, Glow, Hollow and the rest. Shape is below them and holds two choices, None and Curve.
- Select Curve. The text bends immediately along a default arc.
If the panel shows nothing but Style tiles, the panel has not been scrolled far enough. Shape is the last section in it, under every style option.
Set the bend with the Curve slider
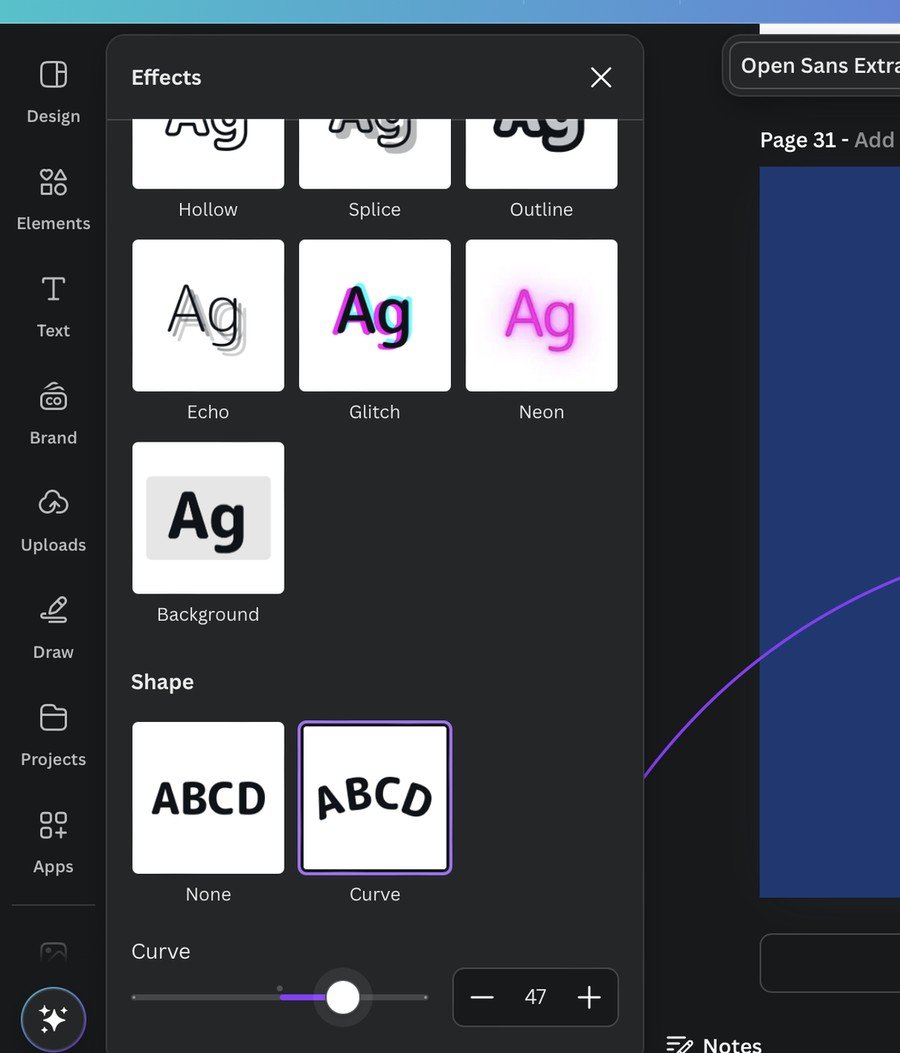
A default arc is almost never the one you want. Selecting Curve a second time opens its settings, which is a single slider with a number beside it.

- Higher values tighten the arc, pulling the ends of the line down until the text wraps towards a full circle.
- Lower values flatten it, and zero returns the text to a straight line without leaving the Curve effect.
- Negative values flip the arc, so the text bows upward instead of down. That is how you get the lower half of a round badge to read the right way up.
- The number field accepts a typed value, which matters when two pieces of text have to share exactly the same arc.
A round badge is two text boxes rather than one. Give the top line a positive value and the bottom line the matching negative value, then drag the second box until the two arcs share a centre. Typing the same number into both, once with a minus sign, gets the curves matching in a way that dragging never quite does.
Curving text in the Canva mobile app
The route is identical on a phone, which is unusual enough to be worth stating plainly.
- Tap the text box once so the bottom toolbar appears.
- Tap Effects.
- Scroll along to Shape and tap Curve.
- Tap Curve again to bring up the slider, then drag it to set the bend.
The smaller screen makes precise slider work harder, so set the rough shape on a phone and type an exact value later if the design needs two arcs to match.
What else sits in the Effects panel
Curve shares the panel with the text styles, and they combine. A curved headline can carry an outline or a neon glow at the same time, which is how most badge and sticker designs are built.
| Effect | What it does | What you can adjust |
|---|---|---|
| None | Plain text | The default |
| Drop | A drop shadow behind the letters | Offset, direction, blur and colour |
| Glow | A soft halo that lifts the text off the page | A single intensity slider |
| Hollow | Outlined letters with no fill | Thickness |
| Splice | Offset outline and fill | Thickness, offset, direction, colour |
| Outline | A solid border around each letter | Thickness and colour |
| Echo | Two offset copies behind the text | Offset, direction, colour |
| Glitch | Red and blue channel separation | Offset, direction |
| Neon | A glow around the letters | Intensity |
| Background | A coloured block behind the text | Roundness, spread, transparency, colour |
Only one Style can be active at a time, but a Style and the Curve shape coexist. Hollow plus Curve gives the outlined ring of text used on stamps and seals, and it takes about ten seconds to set up once the panel is familiar.
Two things curved text will not do
Both limits send people looking for a plugin that does not exist, so they are worth knowing before you start a layout that depends on either.
- It will not follow a shape you draw. The arc is a circle segment and nothing else. Text cannot be made to run along a wave, a heart or the edge of a photo.
- It is not available on body text in Canva Docs. Text effects do not apply to regular document text, so a curved heading has to live in a design rather than in a doc.
For a path that is not a circle, the usual answer is to set each letter as its own text box and rotate them by hand. It is slow and it is the only route inside Canva. Anything more ambitious belongs in a vector tool, in the same way that heavier illustration work moves to a dedicated modelling or drawing package.
Build a round badge from two curved lines
The circular stamp with text around the rim is the reason most people look this up, and it is built from two separate text boxes rather than one clever setting.
- Add the top line and curve it with a positive value, so it bows downward at the ends.
- Add the bottom line as its own text box and type the same number with a minus in front, which bows it the other way.
- Drag the second box until both arcs sit on the same invisible circle. Canva shows pink alignment guides when the two share a centre line.
- Add a circle outline from Elements behind both lines to make the ring explicit, then group all three so the badge moves as one piece.
Matching the two numbers exactly is what makes the result look deliberate. Two arcs a few points apart read as a mistake even when nobody can say why, and typing the values avoids the slow drift that comes from dragging each slider by eye.
Keeping curved text readable
A tight arc damages legibility faster than most people expect, because each letter is rotated away from the one before it.
- Short lines curve better. Three or four words hold their shape; a full sentence on a tight arc becomes hard work.
- Letter spacing needs opening up. On the outside of a curve the tops of letters spread while the bottoms pinch, and a little extra tracking evens that out.
- Heavier weights survive better. A thin script loses its thin strokes to the rotation; a bold sans keeps its shape at the same curve value.
- Capitals read more evenly on an arc than lowercase, because there are no descenders dropping towards the centre of the circle.
Colour matters as much as weight here. Curved text usually sits over an edge, a photo or a shape rather than on flat white, and a mid-grey headline that was legible on the canvas can disappear against a busy background. Either add an outline from the same Effects panel or put a solid shape behind the arc.
Check the result at the size it will actually be seen. Curved text that reads cleanly at full zoom on a laptop can turn to mush on a phone screen or on a cut-out product photo where it sits over a busy edge.
Frequently Asked Questions
Why is Curve missing from my Effects panel?
Either the text box is in editing mode with a cursor inside it rather than selected as a box, or the panel has not been scrolled down to the Shape section, which sits below every Style tile. Curve is available on all plans, so it is not a paywall.
Can I curve text around a circle completely?
Not as one text box. Pushing the slider to its maximum wraps the text a long way round but not the whole way, so a full ring is built from two boxes, one curving down and one curving up with a negative value.
Does curving text work on uploaded fonts?
Yes. The effect rotates each character rather than redrawing it, so a font uploaded to a Brand Kit curves the same way a built-in one does.
How do I straighten text again?
Open Effects, go to Shape and choose None. Setting the Curve slider to zero also flattens the text while keeping the effect applied, which is useful when you are comparing a straight version against a curved one.
Related Articles

Get the Fox Bulletin briefing
The stories that matter, in your inbox. No spam, unsubscribe anytime.
Newsletter signup will be available soon.
Related stories

How to Add Music to Canva Designs and Videos
Adding the track is one click. Trimming it, fading it and exporting in a format that carries sound at all are the three steps that decide whether anyone hears it.

How to Highlight Text in Canva Three Different Ways
One effect does it in two clicks, and its three sliders decide whether the result looks like a marker pen or a solid block.

Connected Carousel in Canva: Build One That Lines Up
The design half is one wide canvas. The half that stops people is the split, because Canva has no built-in command for it and the answer is an app.