

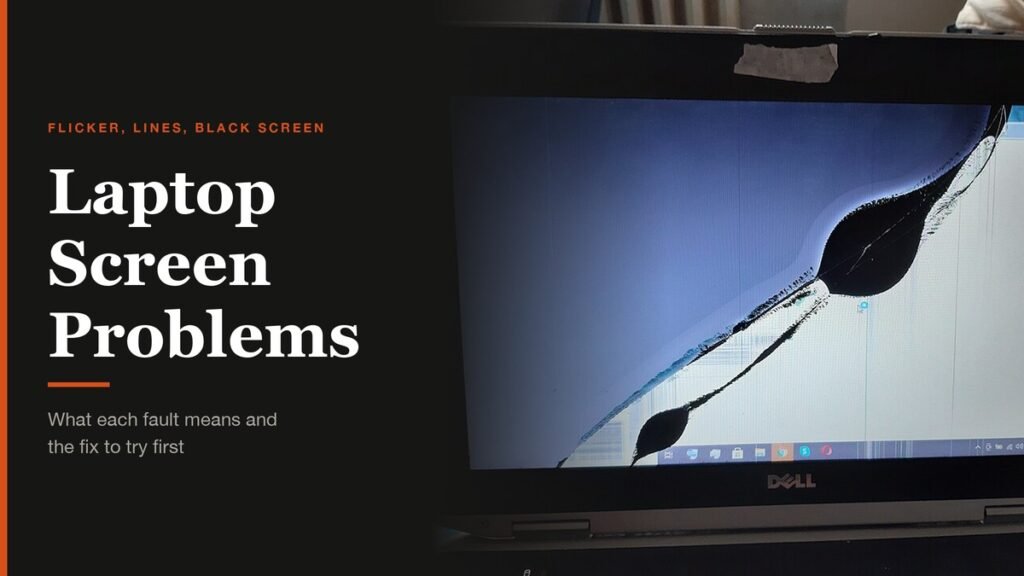
Laptop screen problems tend to look worse than they are. A flickering display, a black screen on a laptop that is clearly running, or a set of lines that appeared overnight can all come from a driver that Windows updated without asking, and those are free to fix. The rest come from the panel, its cable or the graphics chip, and no amount of tinkering in Settings will help.
So the first job is always the same: work out whether the fault lives in the software or the hardware. This guide shows the test that answers that for Dell, HP, Surface and Mac laptops, then walks through each common fault with the fix to try first.
The Short Answer: Software or Hardware?
The quick test: connect the laptop to an external monitor or TV. If the picture there is perfect, the laptop's own panel, backlight or display cable is at fault. If the external screen shows the same flicker or lines, the graphics driver or chip is the likely cause. Then run your laptop maker's built-in screen test, which works outside Windows and confirms the answer.
Common Laptop Screen Problems and Their Likely Causes
| What you see | Most likely cause | Fix to try first |
|---|---|---|
| Screen flickers or flashes | Display driver or an incompatible app | Task Manager test, then roll back or update the driver |
| Black screen, laptop is on | Graphics driver, display mode or a failed backlight | Windows + Ctrl + Shift + B, then Safe Mode |
| Horizontal or vertical lines | Panel, display cable or graphics chip | Built-in screen test and an external monitor |
| Screen too dim or keeps changing | Brightness settings or adaptive brightness | Turn off automatic brightness |
| Single dot stuck on one colour | Dead or stuck pixel | Built-in screen test, warranty claim if several |
| Cracks, ink blots or bleeding colour | Physical damage to the LCD | Panel replacement |
Each row is covered below. Start with the test section, because a hardware result saves you from wasting an evening reinstalling drivers.
First, Test Whether the Problem Is the Screen or Windows
There are two checks worth doing before you change a single setting. Neither needs any software installed.
Connect an External Display
Plug the laptop into a monitor or TV with an HDMI or USB-C cable. A modern ultrabook with only USB-C ports needs an adapter, and our guide to the best USB-C to HDMI adapters covers which ones carry a clean 4K signal. Press Windows + P and choose Duplicate so both screens show the same picture.
- External screen is clean, laptop screen is not: the fault is in the laptop's panel, backlight or display cable.
- Both screens show the fault: the graphics driver or the graphics chip is more likely.
- Both screens are black: the laptop may not be booting at all, which is a power or startup fault rather than a screen fault.
Run the Built-in Screen Test
Most laptop makers ship a display test that runs before Windows loads. Because it bypasses Windows and its drivers entirely, a fault that shows up here is hardware.
- Dell: with the laptop fully off and the charger connected, hold the D key and press the power button. Keep holding D until solid colours fill the screen. The LCD built-in self-test cycles through black, white, red, green and blue. Press Esc to stop.
- HP: turn the laptop on and press Esc about once a second until a menu appears, then press F2 to open HP PC Hardware Diagnostics UEFI. Symptom Tests and Component Tests run from there.
- Microsoft Surface: turn it off, hold Volume up and press and release the power button, then let go of Volume up when the UEFI screen appears. A problem that is still visible in UEFI points to hardware.
- Mac: Apple Diagnostics starts on Apple silicon by holding the power button until Options appears, then holding Command-D. From macOS Tahoe 26 you can pick a diagnostic for the built-in display.
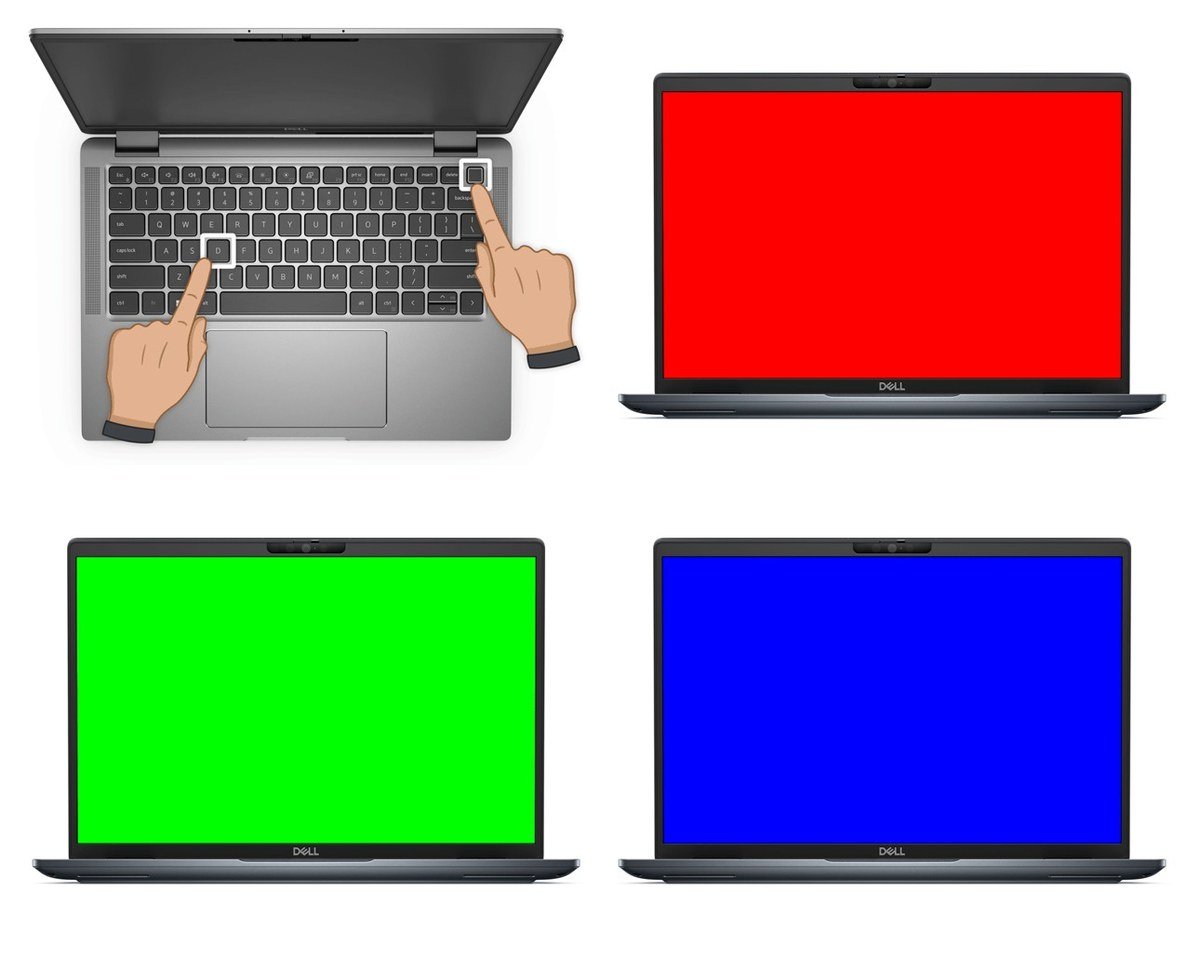
Look at every colour carefully. Lines, dots that stay a different colour, patches that stay dark and washed-out colours usually appear on more than one colour, and where they sit on the panel is worth noting for a repair shop.
Laptop Screen Flickering
Flickering is the fault most often fixed at home. Microsoft's flickering guide traces it to two causes in Windows 11: a display driver or an incompatible app. A one-step test tells them apart.
- Press Ctrl + Shift + Esc to open Task Manager.
- Watch Task Manager for a few seconds. Check: if it flickers along with everything else, the display driver is the cause. If it stays steady while the rest flickers, an app is.
- For an app, update it from the Microsoft Store or the developer's site, or uninstall recently added apps one at a time, restarting after each.
- For the driver, press Windows + Ctrl + Shift + B to reset it. A beep or a brief blink confirms it ran.
If the reset does not hold, fix the driver itself in Device Manager. Search for Device Manager on the taskbar, expand Display adapters, right-click your graphics adapter and choose Properties, then open the Driver tab.
- Roll Back Driver if Windows Update changed something recently. A greyed-out button means there is no earlier driver to return to.
- Update Driver if the flicker has been there for a while. Your laptop maker's support page often carries a newer driver than Windows Update.
- Uninstall Device, tick the box to remove the driver, and restart. Windows reinstalls a driver on the next boot.
Flicker that also appears in the built-in screen test is a different problem. That points to a loose display cable or a failing panel, and it needs a repair.
Black or Blank Laptop Screen
A screen that stays black while the keyboard lights up, fans spin or Windows plays its startup sound is usually a display fault, not a dead laptop. Work through these in order.
- Plug in the charger and wait a minute, in case the battery has simply run flat.
- Press Windows + Ctrl + Shift + B to reset the graphics driver.
- Press Windows + P, then P again and Enter, to cycle display modes. A laptop last used with a projector can be stuck sending its picture to a screen that is no longer there.
- Press Ctrl + Alt + Delete. If the security screen appears, open Task Manager and restart Windows Explorer.
- Hold the power button for 20 seconds to force a full shutdown, then start the laptop again.
If the screen is black only after you sign in, or only after an update, boot into Safe Mode and fix the driver from there. Hold the power button for 10 seconds to force the laptop off, and repeat that two or three times until Windows opens its recovery environment. Then choose Troubleshoot, Advanced options, Startup Settings and Restart, and press F5 for Safe Mode with Networking.
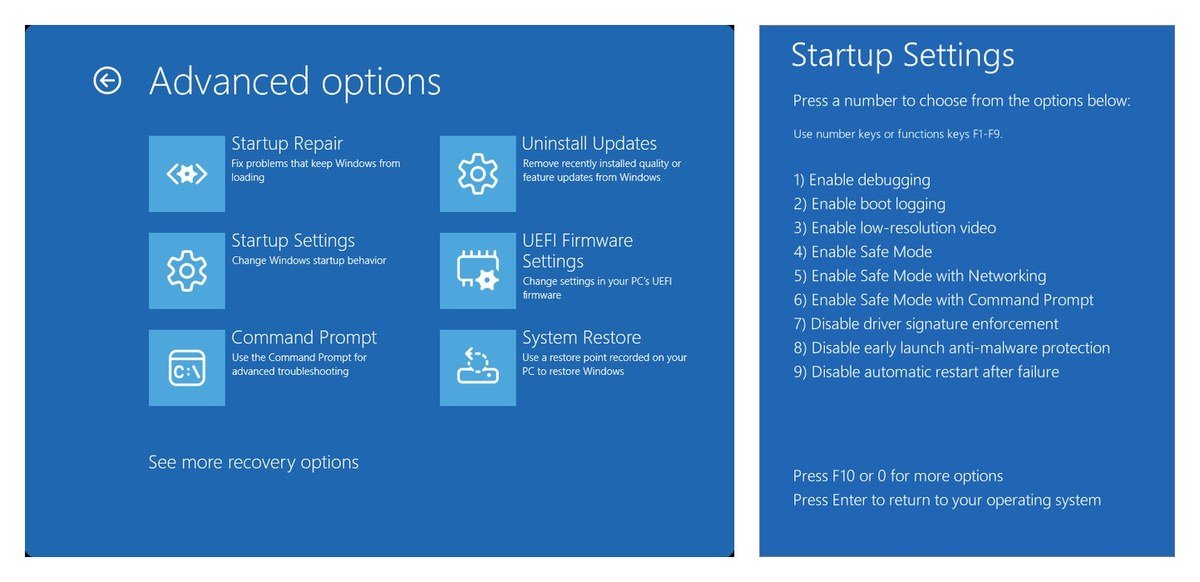
In Safe Mode, roll back or update the graphics driver in Device Manager, or use System Restore under Advanced options to return to a point before the problem started.
One more check is worth a minute. With the laptop on and the screen black, shine a phone torch at the display at an angle. A faint image under the light means the panel is working but its backlight is not, which is a repair job.
Lines Across the Laptop Screen
Horizontal or vertical lines are the clearest sign of hardware trouble. Single-pixel lines in one colour usually mean the panel itself, while lines that shift, flicker or change when you move the lid tend to point to the display cable that runs through the hinge.
- Lines in the built-in test and not on an external monitor: panel or cable. A technician can tell which, and the cable is the cheaper repair.
- Lines on both screens: the graphics chip or its driver. Try the driver fixes above before assuming the worst.
- Lines that appeared after a drop or pressure on the lid: the panel is damaged and needs replacing.
Keep using the laptop with an external monitor until it is repaired. Lines from a damaged panel do not harm the rest of the computer.
Dim or Dark Laptop Screen
A screen that is too dark or keeps changing brightness on its own is nearly always a setting. Open the quick settings panel from the network icon on the taskbar and move the brightness slider, or go to Settings, System, Display.
- Brightness that changes with the room: under Display, select Brightness and turn off the option that changes brightness automatically when lighting changes.
- Brightness that changes with what is on screen: set Change brightness based on content to Off. On battery-powered laptops it defaults to On Battery Only, which is why the screen dims in dark scenes once the charger is out.
- Dim only on battery: check the battery saver setting, which lowers brightness to save power.
A screen that is dim at every setting, or darker in one corner, suggests an ageing backlight. Run the built-in test, and if the colours look dull there too, the fault is hardware.
Cracked or Damaged Laptop Screen
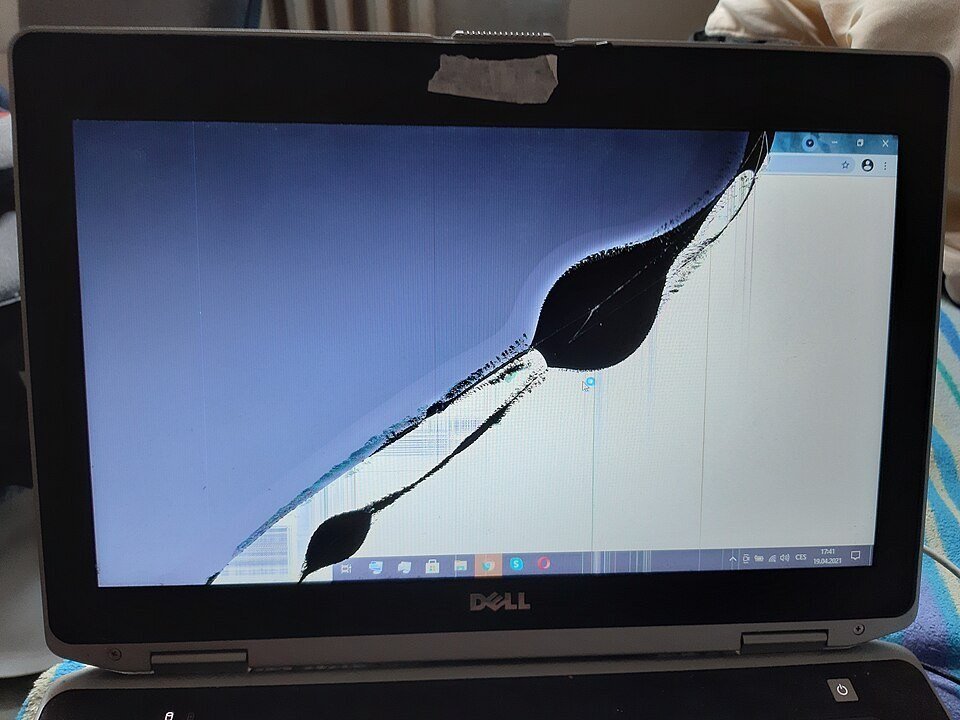
A crack, a dark blot that spreads like ink, or a rainbow of colour around a pressure point means the LCD itself is broken. Nothing in software will help, and the only fix is a replacement panel.
- Stop pressing on the damage. The liquid crystal spreads further every time the panel is flexed.
- Back up now. Connect an external monitor and copy your files while the laptop still works.
- Check your cover. Standard warranties generally exclude accidental damage, but an accidental damage plan or home insurance may pay for the panel.
- Weigh up the cost. On an older budget laptop, a replacement panel plus labour can approach the price of a new machine.
If the repair quote is close to replacement cost, our comparison of a Chromebook vs a Windows laptop is a useful place to start shopping.
Mistakes That Make a Laptop Screen Problem Worse
- Reinstalling Windows for a hardware fault. If the fault shows up in the built-in test, a reset only costs you time.
- Downloading drivers from third-party sites. Use Windows Update, Device Manager or your laptop maker's support page.
- Closing the lid on a cracked screen. Pressure from the keyboard deck can spread the damage.
- Ignoring a flicker that comes and goes. An intermittent cable fault usually gets worse, and it is cheaper to fix early.
Frequently Asked Questions
Why is my laptop screen flickering?
In Windows 11 the cause is usually a display driver or an incompatible app. If Task Manager flickers too, fix the driver. If it does not, update or remove recent apps.
Can a laptop screen problem fix itself?
Software faults sometimes clear after a restart or update. Lines, cracks, dead pixels and a failed backlight do not, and some get worse with time.
How do I know if my laptop screen needs replacing?
Run the built-in screen test. If the fault appears there and the picture on an external monitor is clean, the panel or its cable needs repair.
Is it safe to use a laptop with lines on the screen?
Yes. A damaged panel does not affect the processor, storage or battery, so the laptop works normally with an external monitor until it is repaired.
Related Articles
- Green Line on Phone Screen: Causes and How to Fix It
- Best Gaming Monitor: 7 Picks From 1080p to OLED
- PC Parts Explained: Every Component in a Desktop Computer
- DOS vs Windows Laptop: What Is the Difference and Which to Buy
- Black Spots on Laptop Screen: Causes, Fixes and When to Repair
- Second Monitor Not Detected? Fixes for Common Multi-Monitor Problems

Get the Fox Bulletin briefing
The stories that matter, in your inbox. No spam, unsubscribe anytime.
Newsletter signup will be available soon.
Related stories
Second Monitor Not Detected? Fixes for Common Multi-Monitor Problems
A second monitor that shows no signal is usually a cable, input or display mode problem. Here is the fix for that and every other common multi-monitor headache.
How to Scan Mac for Malware: A Complete Step-by-Step Check
Macs scan themselves, but not on demand. Here is how to check a Mac for malware by hand, which free tools help, and the 2026 copy-paste scam to watch for.

How to Split Screen on iPad: Side by Side, Slide Over and More
Split screen on iPad now lives inside Windowed Apps. Here is how to put two apps side by side, resize them, float a third in Slide Over and go back to one app.